
Are you looking for a creative way to elegantly elevate the look and ambience of your home? Adding the right flower display to your living space may just be what you need. It’s one of the simplest ways to add a flash of colour or create a specific vibe in your house. And the best part is that you can create your own unique design from the ground up! All that’s needed is creativity and time to transform your home into a stylish and charming space.
But what do you need to create the perfect display? We’ve got you covered. We’ll be sharing with you the best flowers to use for different arrangements, detailed descriptions of how to put together a display, and tips and tricks to make the whole process easier.
So, all you have to do is tie back your hair and prepare to have fun as you create these beautiful pieces for your home. If you already have a garden with beautiful blossoms, you won’t be spending a dime. Alternatively, if you must buy flower bouquets, a few dollars at the nearest supermarket or florist shop will be enough.
1. A Tropical Floral Forest look with Classic Calla Lilies
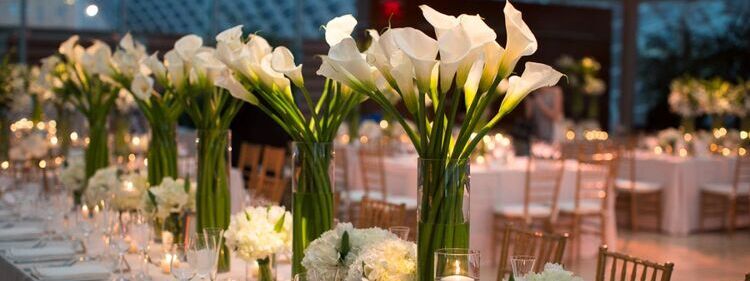
For a simple, yet elegant arrangement, you can go for white calla lilies in a clear vase with green tropical foliage. This display creates a beautiful and eye-catching focal point for either your entry foyer or living room. Alternatively, if you want to hide the roots, you can either remove them totally or use an opaque vase. Blue or copper colours go well with white flowers.
As you can see, there are many ways to create a lovely tropical calla lilies display. And the best part about this type of arrangement is that it complements pretty much any type of interior decor. Whether you have a modern, contemporary, or even country-style interior setup, this calla lily display will blend in perfectly. It will also work well with both dark and light room colour palettes. Dark interior tones create a cosy, tropical rainforest feel, while lighter tones, such as cream or neutral hues, elicit a tropical, summery feel.
To augment this tropical look and ambience, you could also think about placing a few other large green indoor plants around the room. A combination of floor plants, potted plants, and hanging plants would work perfectly. eep this display away from direct sunlight so that the blooms remain fresher for longer.
Tip: If you have a love for colours and bold statements, consider going for the colourful Asiatic lily varieties instead. Characterised by the seemingly endless variety of rich hues in which they are available, these large, star-shaped blossoms will definitely make a statement in your home. They also have a slightly longer bloom time compared to other types of lilies.
What You Need For the Display
- Sharp secateurs (or knife or scissors)
- Large clear vase
- Water
- White vinegar
- At least 8 to 10 open-cut calla lilies
- 3 to 4 small palm fronds and ferns
- A handful of greenery
How To Arrange The Fresh Flower Display
This section will describe how to recreate the first display above. Achieving this flower display is an easy process that should take no more than 10 minutes. It’s also one of the most cost-effective options.
Step 1: Begin with the Calla Lilies
If you are sourcing the flowers from your garden, use the secateurs to neatly snip off the lilies at a length of about half an inch to 1 inch from the bottom. Limiting the length at which you cut off the stem ensures that they can rebuild themselves back so you can enjoy more flowers during the next blooming season.
Additionally, during this process, keep in mind that you only need to prune the stem alone, not the foliage. This is because you will be arranging the stems in water later and leaves tend to rot quickly. Removing the leaves helps to reduce microbial activity and bacteria build up in the water. Fortunately, calla lilies make this easy to do because their long stems are generally leafless, with most of their foliage sprouting near the bottom of the plant.
Once you’ve cut off the lilies, place the stems into a large bowl filled with lukewarm water and slightly trim the bottom – half an inch will suffice – at a 45-degree angle. Cutting the stems at an angle helps them to absorb water more readily and doing this while the stems are underwater prevents air pockets from forming, which also interferes with water absorption. These steps will result in a more attractive and longer-lasting fresh flower display.
Remember to check and change the water in the vase after every 2-3 days to prevent bacterial growth. Remove any petals or leaves that have fallen into the water, since they will rot rapidly and contaminate the water. Properly cut and prepared fresh lilies will last up to two weeks in a vase display.
Step 2: Add Green Accents
After adding your lilies to the vase, the next step is to layer the arrangement with palm leaves and ferns. This foliage will serve as a backdrop to the lilies and provide a lovely horizontal contrast to the lilies’ vertical stems. Not only do they add volume, depth, and interest, but also their deep green colour will serve to accentuate the white bulbs of the lilies.
For the palm leaves, you can’t go wrong with the sago, areca, or parlour palm varieties. Their pinnate leaf structure where each leaflet is separate from the other – contrary to the webbed-like leaves of other palms – and their upright v-shaped leaflets will increase the vibrancy and appeal of the arrangement without dominating it. As for ferns, most varieties are suitable.
Try to balance the display so that the showy nature of the palms and ferns doesn’t overshadow the lilies, but rather complements them. Also, remember to make sure that none of the palms’ or ferns’ foliage is submerged under the water line inside the vase.
Step 3: Finish off with other Tropical Greenery
The purpose of incorporating additional greenery into the display is to enhance the signature tropical look and feel of the arrangement as well as to accentuate the white blossoms further. You can use green foliage of different shapes and textures for a more creative layout.
Monstera or massangeana leaves will work beautifully for this display. Place them in front of the lilies and artistically fold any pieces that poke too high out of the vase. Ideally, the foliage height should not exceed more than three-quarters of the overall flower height. And here’s another tip: to give the display a more uniform look, try to match the colours of the greenery as closely as possible to the palms or ferns, even if you go for different textures.
2. Multi-variety Arrangement in Mason Jars
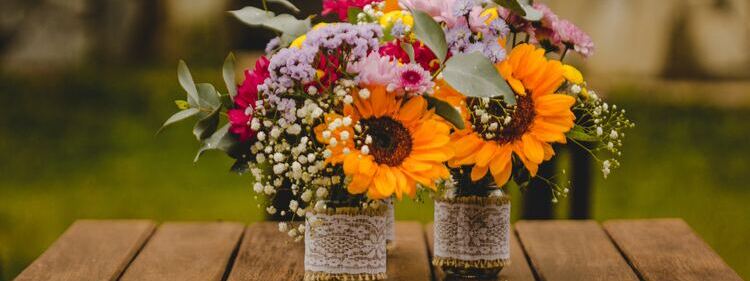
Use regular mason jars neatly covered with delicate lace and natural fibre wraps to instantly elevate the overall look of your floral display. What we love about this arrangement is that it exudes a chic yet bohemian, summery charm all at once. Incorporating blooms of varying sizes, shapes, and textures helps the arrangement’s visual interest and creates an eye-catching finish. For the wrap beneath the lace, this arrangement uses hessian cloth, but you can opt for any other type of natural fibre you prefer or that’s most accessible to you, including raffia, hemp, or even palm fibres.
The sunflower is clearly the star of this arrangement, but it has a very strong supporting cast. Aside from spreading joy, the sunflower’s main function is to create a strong focal point with its huge size and vibrant colour. Then, for a beautiful contrast, smaller and lighter pink daisies and yellow carnations are added. If you don’t have sunflowers, Flowers Across Melbourne has a large assortment ranging from a single sunflower to bouquets.
This display turns up the excitement a little higher with the inclusion of the hot pink carnations. Or you can also go with gerberas, peonies, petunias, or any other flower that’s available in a bright pink colour. With the multiple cultivars available today for most flowers, the options are plenty. Smaller light purple wildflower clusters and even smaller white flower clusters enhance the image with another layer of subtle beauty.
This multi-coloured flower display will work well in a space with monochromatic walls or with an accent wall. Because the arrangement is quite colourful on its own, it will complement a well-coordinated room with more muted tones and fewer accessories and trinkets. Great examples include a space with earthy tones or a cream-coloured palette with a pastel blue or green accent wall.
What You Need For the Display
- 2 clear mason jars
- Pair of secateurs or scissors
- Pencil/pen
- Lace
- Hessian cloth/burlap
- Hot glue / twine / bonding tape / binder clip
- Twine, fabric glue/bonding tape, or binder clips
- Water & vinegar mixture
- 2 to 3 sunflowers
- A handful of light pink daisies
- A handful of larger hot pink carnations
- A handful of light purple and white tiny wildflowers
- Eucalyptus leaves
How To Arrange The Fresh Flower Display
Feel free to be as creative as you like with this display. For example, if you’re particularly deft with a sewing machine, you might consider repurposing the lace from an old dress. The advantage of this option is that you’ll be recycling material and helping to reduce waste; however, the drawback is that you may not have as much choice in terms of design and pattern as when purchasing the fabric from the shop
Step 1: Prep the Jars
Before you put the flower arrangement together, prepare the two wrapping materials. Start with the hessian cloth and measure the amount of cloth needed by wrapping it around each jar. Using a pen or pencil, mark the length along the cloth where it gives the tightest fit around the jar. You don’t want the piece you cut to be too big and slip off or too small that it doesn’t wrap all the way around the jar. Once you’re happy with the fit, use your scissors to cut off the piece that you need. To get a second piece of hessian cloth for the second jar, just place the piece you just cot over the larger, uncut hessian cloth, mark the measurement and cut another piece.
Repeat this whole process with the lace; however, remember that the lace will be sitting on top of the hessian cloth so to get an accurate measurement re-wrap the jar with the piece of hessian cloth you just cut and then wrap the lace material on top. Next, mark the length along the lace fabric and cut the pieces needed.
Once the fabric is ready, wrap each material around the jar and secure their ends together.
Three securing methods
Twine: use the twine to secure the lace by tying the top and bottom ends.
Fabric glue or bonding tape: to permanently secure the fabric onto the jar, fabric glue or bonding tape will do the trick. If you use glue, remember to allow time for it to set each time after applying so that it creates stronger bonds.
Binder clips: if you only want a temporary hold that you can remove anytime you want, go for binder clips. However, to hide the clips from view, you may have to be a little creative in how you arrange the flowers, particularly the larger ones.
Step 2: Arrange the Flowers
Once the hessian cloth and lace are secure, fill the mason jars up to three-quarters with water and vinegar in preparation for arranging the flowers. Trim the flower stems with scissors or secateurs and remove leaves that may be submerged under the water mixture in the jars. Now you can begin to arrange the flowers according to your preference.
Starting with the focal flowers first may make it easier to fit in the smaller blooms and greenery later. And it may also help to spark creative ideas on how to arrange and style the display so that all of the flowers complement each other.
Lastly, finish off with the eucalyptus. This native not only adds a refreshing fragrance to the arrangement but also its height and unique silver-green colour bring great visual balance to the display. To have a fresh eucalyptus bouquet delivered right to your doorstep on the same day, order from Flowers Across Melbourne today.
3. Gorgeous Rose Wall Display

This is not your typical rose bouquet arrangement. Designed to show off your beautiful roses in a more striking and unconventional way, this display is guaranteed to grab everyone’s attention. As a bonus, it also creates a perfect Instagrammable spot right in the middle of your own home, saving you precious time traipsing around the city in search of a visually interesting place to take a photo.
For this display, you can decide to go for either fresh, dried, or preserved flowers. Fresh roses are a favourite because they provide different looks as they change from fresh to dry over time. If you go the fresh rose route you may want to think about either growing your own blooms in order to have a ready supply of replacement roses for the display or going for the Flowers Across Melbourne’s gigantic One Hundred Reasons bouquet. It has – you guessed it – 100 stemmed roses that will more than suffice to create a show-stopping arrangement for your home.
Additionally, the best part about this display is that it can work pretty much anywhere in your house. You can place it outdoors on your veranda for when you host a summer get-together, your birthday, or even a small engagement party. Alternatively, if you’re looking to fill up a boring empty white wall in your living room or bedroom, this display is the perfect solution. Feel free to experiment with different sizes and even quantities of the floral frames so that they can best meet your preferences and the needs of your space.
Tip: You can swap the uniformity of the coral roses for a brighter and multicoloured pastel floral wall by using gerberas or carnations instead of roses. To mix things up, you can also change the colours of the frames. Use light blue, coral, pink, white, yellow, or olive colours for the frames or flowers to create the perfect nursery or décor for your baby’s first birthday!
What You Need For the Display
- Heavy duty light coloured wood planks (extra thick to create adequate depth)
- Measuring tape
- Power saw
- Strong wood glue
- Glue gun
- Clamps
- Claw hammer or nail gun
- Nails
- 120-grit and 150-grit sanding papers
- White paint and paintbrushes
- Newspaper
- Coral or hot pink rose bouquets
- Waterproof mat board (optional)
- Cardboard
- Double-sided mounting tape or thicker nails and glue gun
- Water
- White vinegar
- Square-shaped flower foam
- Sharp secateurs (or knife or scissors)
- Coral or hot pink roses
How To Arrange The Fresh Flower Display
Creating this flower display is simple but requires some DIY woodworking skills. This is because you will have to put together the wooden frames before you design the display.
However, if you don’t want to attach anything to your wall, you can simply make the frames, complete with the flower foam inside, and use them as creative table vases instead. Once done, set the frames on any table around your house to create a stylish wooden flower vase display.
Step 1: Make and Test the Frames
For this display, you will need to make four frames, but if your space needs more then make more. To create the frames, use the power saw to cut the wood to your desired length, width, and thickness. If you’ve done some woodworking before, you’ll be aware that you need to cut the corners of each wood plank at a 45-degree angle so that they fit into each other.
Since you will be inserting a flower foam into each frame, remember to make the measurements of the interior of the frame the same as the measurements of the flower foam in order to accommodate the foam. Flower or floral foams are the sponge-like green materials used by florists to shape floral arrangements into any design imaginable. They help to stabilise and hold the arrangement together when displayed and they also prevent microbial activity, which helps to prolong the life of fresh flowers.
So, to incorporate the floral foam well, you will also need to ensure that the frame has enough depth to allow the foam to sit on top of it. If you don’t want to create very deep frames, you can halve the thickness of the foam instead.
Next, use a glue gun to apply glue on the entire edges of the frame and the centre, then press each outer edge of the frame closer to the other to create the 90-degree angles. Use a paper towel to wipe off excess glue formed on the outside when you glued the wood together. Use clamps to hold the frames together until the glue dries and hardens. You can place the frames on old newspapers while they dry.
Test the size of the frame with the flower foam to ensure they fit by holding it against the frame. If the foam is too thick to fit into the frame’s depth, cut it in half diagonally. Ideally, the flower foam should fit into the frame and leave a space of at least 3 to 4 inches in front of it.
Use a claw hammer or nail gun to drive nails into each corner of the frames for extra reinforcement. Exercise caution to ensure that you don’t break the wooden frames. Sand the frames using 120-grit sanding paper, then 150-grit sanding paper to smoothen the wood surface and paint the frames. Once all of the frames’ corners and crevices have been neatly sanded, set the frame aside.
Step 2: Assemble the Arrangement
Start by soaking the flower foam in a water and vinegar solution to absorb as much water as the flowers. While you cut the flowers, let the foam rest and allow the excess water to drain away. As the foam dries, it loses some weight that may otherwise impact the stability of the frame on the wall.
Next, use scissors to freshly trim the stems, so that they don’t protrude when you pin them into the foam. Avoid overloading the frame by limiting the number and size of flowers you attach to the floral foam. Excess weight could cause the frame to topple from the wall. Similarly, don’t soak the foam with too much water, as this will also impact the foam.
Step 3: Add the Foam to the Frame
Once the flowers have all been firmly attached to the firm, it’s time to place the foam onto the frame. This should be done carefully to not disturb the arrangement or crush the flowers in any way. When you’re happy with the placement, secure the rear side of the frame with mat board, then the outer cardboard.
Step 4: Mount the Frames
Use heavy-duty double-sided tape attached to the back of the frames to mount them on the wall. If you want more stability, you can nail the frame to the wall on both ends. Spray the foam with water-vinegar moisture by slightly pushing the flowers aside after every few days to keep the flowers fresh for longer.
4. A Hanging Flower Display
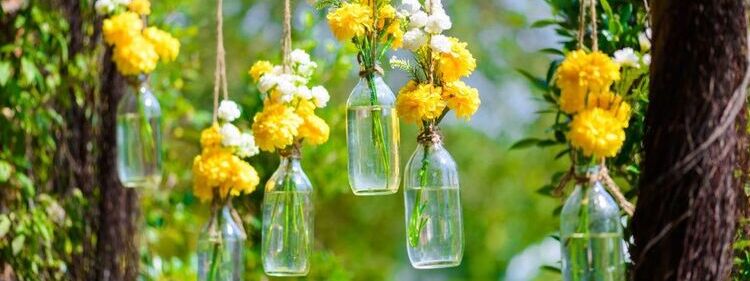
Unique and versatile, this hanging flower display works great both indoors and outdoors. Whether you want to liven up your veranda or add a bit of unexpected whimsy to your garden, this arrangement is perfect for both. You could even opt for something more permanent in your home by attaching the bottles to a wood plank at varying lengths and then fixing the plank to the roof beams of your dining area or kitchen. This would work best in rooms with high ceilings.
This arrangement uses white and yellow flowers, with the elegant beauty of white blooms complementing the vibrant charm of yellow. However, you can go with any colour combination that tickles your fancy. To get the best out of this look though, we would advise keeping it to between two to three colours only and maintaining the same colour combination for all the bottles.
For the yellow flowers, the ideal blooms to use are yellow or orange marigolds. Their pompom-shaped flowers offer a fuller look that captures attention. If you are going for a more classic look, Persian buttercups are a good choice. Available in a wide range of colour options, from peachy pink to yellow and orange, their yellow varieties offer a dense and ruffled petal arrangement that gives a sophisticated layer to the display. Other excellent yellow to orange flower varieties are chrysanthemums and dahlias.
The best option for the white flowers is the white Roseform begonia. These delicate blossoms are adorned with large showy, fully double white flowers that are so appealing. To add some creative spice to this arrangement you could try varying the flower textures and shapes for each bottle.
What You Need For the Display
- Double-sided taped hooks
- Existing curtain poles (optional)
- Heavy-duty twine (at least 10m to 20m long)
- Step ladder
- Used see-through milk glass bottles or wine bottles
- Plastic cup and funnel
- Water
- White vinegar
- Sharp secateurs (or knife or scissors)
- Bunch of white begonias
- Bunch of yellow or orange flowers, like marigolds, buttercups, carnations, etc.
- Small bulbed friendly string lights (make sure they are appropriately rated for indoor/outdoor use)
How To Arrange The Fresh Flower Display
Setting up this fresh flower display is an easy and fun task with some DIY crafts.
Step 1: Setup the Twine
Whether you arrange the bottles indoors or outside, look for convenient points to tie the twine that will support them. If you are indoors, you can connect double-sided taped hooks at various locations on the wall depending on how you want to connect the twine. You can also use hooks and curtain poles as a way to support the display.
If you are outdoors, use large branched trees to connect the twine from branch to branch (or from tree to tree if you are using multiple tree points). Because this arrangement must be hung from an elevated place, have a stepladder handy to safely access these connecting points.
Once done with the point-to-point connection, make another batch of the twine and fold each twine in half. Drape the folded twine across the connection points, adding as much twine as you need to hold the bottles.
Step 2: Secure the Bottles
Take the empty bottles and use the draped twines to secure them in place. To do this, make circular tying motions with the twine on both draped sides and then tie two final knots. Then gently pull on each bottle to ensure it’s firmly fastened. You may notice some of the bottles leaning to one side, but don’t let this worry you because they will naturally balance out and stand upright once you add water.
Step 3: Add Water and Flowers
Climb your stepladder and fill the bottles halfway with a water and vinegar mixture using a plastic cup and funnel. Next, add at least two yellow flowers and three to four white begonias in each bottle. Arrange them how you like and there you have it – you’ve created a lovely hanging flower display.
Step 4: Add Lights (optional)
To add extra style or a romantic vibe in the evening, drape string lights across the twines and branches/hooks/curtain poles.
5. A Voluminous Floral Display

To conclude our list, we’re going all the way out with this majestic floral display! This arrangement will work well on your dining room sideboard, in the foyer – perhaps atop a console table – and even on a very sturdy coffee table in the middle of your living room,
Methodically put together, the grand arrangement on the far right instantly attracts the eye with the deep purple lance-shaped focal flowers in the centre. Its butterfly-shaped flowers, which grow along half of its long stem, are distinct from the shape of all the other flowers, which are pompom-shaped. You’ll also notice that the colours of the flowers grow paler as you gradually move from the centre to the outer row of the arrangement until the final row, which is once again a deep purple. This design balances the arrangement and also makes the smallest blooms more noticeable.
When working with an imposing display such as this, it’s always best to stick to only one or two flower colours and instead play around with different floral shades and tones, as well as shapes and textures. The purple blooms featured in this arrangement comprise large lavender blooms, ornamental alliums, snapdragons (or buddleias), lavender roses, and water lilies; while white roses and white chrysanthemums make up the rest of the display.
Replicating this precise design will likely be expensive; nevertheless, one could argue that the message this display makes is definitely worth it. However, as a result of its multiple components, you can easily customise this dramatic arrangement to fit your budget as exemplified by the middle and far right displays. Consider recreating only some parts of the arrangements and perhaps modifying, scaling down, or foregoing other parts.
What You Need For the Display
- 1 tall clear vase (80cm)
- 6 medium-sized clear vases (50cm)
- 4 smaller-sized clear vases (30cm)
- 4 small-sized circular clear vases (20cm)
- 4 round clear bowls (10cm)
- Sharp secateurs (or knife or scissors)
- A large bouquet of lavender
- A large bouquet of snapdragons or buddleias
- 6 bouquets of ornamental alliums
- 4 bouquets of lavender roses
- 4 bouquets of white roses
- 2 bouquets of white chrysanthemums
- Water lilies
How To Arrange The Fresh Flower Display
When working on this arrangement, you will be amazed as you see the centrepiece take shape with every vase and flower that you layer. This setup truly is a work of art!
Step 1: Prepare the Vases
On a large round console table, arrange the vases in a circular formation. Start by placing the tallest vase at the centre, and then place the six medium-sized vases around the taller vase. The next row of the arrangement is made up of four smaller clear vases around the medium-sized vases and after that come the four small circular vases. Finally, the last outer row comprises the four small clear bowls.
Once done, fill each vase to about three-quarters with a water and vinegar mixture.
Step 2: Prepare the Flowers
As usual, for the flowers to remain fresher for longer, use your scissors or secateurs to trim an inch off the bottom of the flower stems at a 45-degree angle. Remember to place the stems in water when trimming in order to prevent air bubbles from forming.
Regularly check the water for any fallen petals and remove them immediately. Aim to change the water in the vases after 4-5 days or whenever it becomes slightly foggy.
Step 3: Add Flowers to the Vases
Working from the inside out, start by placing all of the large purple lavender flowers and the buddleias into their respective vases. Starting with the larger vases first minimises the possibility of disturbing the arrangement due to the myriad of vases involved as you move outward.
Next, divide the ornamental alliums equally between each of the six medium vases on the second row, followed by the bouquets of white roses and chrysanthemums on the next row of smaller vases.
The small bunch of lavender roses go in the penultimate row, offering a bit of contrast in the shade to the larger flowers. The lavender roses, though larger in size, give the illusion of being smaller than the clustered lavender, buddleias and ornamental alliums, due to the smaller vases used to display them.
Lastly, come the water lilies, which go into each of the tiny clear bowls to provide the finishing touch.
Closing
If you’re looking to make a statement in your home, you can’t go wrong with any one of these five fabulous flower displays. Whether you have a contemporary style, farmhouse, industrial, Mediterranean, or any other type of home, these fresh flower displays are designed to effortlessly add value and elevate your space.
These displays are also perfect for a myriad of occasions, including bridal showers, birthdays, barbies, or simply a relaxed self-care Sunday. You are guaranteed to find a display that works for you. A majority of them are also inexpensive and only require a bit of time, enthusiasm, and a smidge of DIY skills to put together. With some patience, you can recreate your own tropical paradise or chic setting without needing to pay for a decorator.
And the best thing about each of the arrangements featured is that they are incredibly versatile. They can be easily modified in terms of colour, shade, shape, size, and texture according to your preferences and budget. The key thing is to just have fun and let your imagination run wild. For all of your floral needs, check out Flowers Across Melbourne for our wide range of fresh flower arrangements delivered the same day.

No Comments